The Project Gutenberg eBook of Beef Slaughtering, Cutting, Preserving, and Cooking on the Farm
Title: Beef Slaughtering, Cutting, Preserving, and Cooking on the Farm
Author: H. Russell Cross
E. Curtis Green
William R. Jones
Anthony Kotula
R. L. West
Release date: August 4, 2020 [eBook #62848]
Most recently updated: October 18, 2024
Language: English
BEEF Slaughtering, Cutting, Preserving, and Cooking on the Farm
| USDA Seal | UNITED STATES DEPARTMENT OF AGRICULTURE |
FARMERS’ BULLETIN NUMBER 2263 |
PREPARED BY AGRICULTURAL RESEARCH SERVICE |
||
PRECAUTION
The Federal Meat Inspection Act requires that all meat which is to be sold or traded for human consumption must be slaughtered under inspection in an approved facility under the supervision of a State or USDA meat inspector. A person can slaughter his animals outside such a facility only for use by himself, members of his household, and his nonpaying guests and employees. He is not allowed to sell any portion of the carcass. For more details about these regulations, consult your county extension agent or write to the Animal and Plant Health Inspection Service, United States Department of Agriculture, Washington, D.C. 20250.
CONTENTS
| PAGE | |
| Selection and care of animal before slaughter | 1 |
| Preparing for slaughter | 2 |
| Slaughter | 6 |
| Chilling the carcass | 35 |
| Cutting | 37 |
| Freezing and frozen storage | 59 |
| Further processing | 59 |
| Meat cookery | 65 |
This bulletin supersedes Farmers’ Bulletin No. 2209, “Slaughtering, Cutting, and Processing Beef on the Farm.”
Department publications contain public information. They are not copyrighted and may be reproduced in whole or in part with or without credit.
| Washington, D.C. | Issued—1977 |
BEEF SLAUGHTERING, CUTTING,
PRESERVING, AND COOKING ON THE
FARM
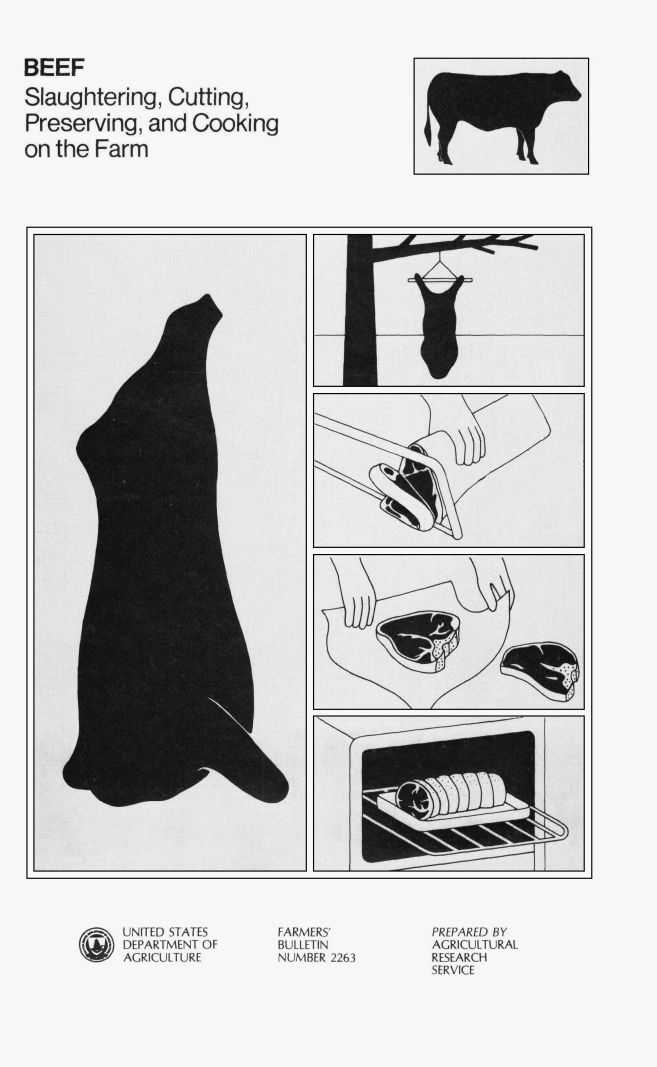
By H. Russell Cross,1 E. Curtis Green,2 William R. Jones,3 Roger L. West,4 and Anthony W. Kotula5 (Photographs by Donald K. Rough6 and Terry K. O’Driscoll7)
SELECTION AND CARE OF ANIMAL BEFORE SLAUGHTER
Several factors should be considered before slaughtering a beef animal for home consumption. The most important considerations are health, kind of animal (calf, steer, or heifer or cow), expected meat yield, and care of the animal prior to slaughter.
Health
One should take care that an unhealthy animal is not selected for slaughter. At the time of selection, look for signs of sickness such as fever, increased breathing rate, and diarrhea. Animals suspected of being unhealthy should be treated by a veterinarian until the animal is returned to a healthy state.
Animal Care
To obtain high-quality meat, it is important to exercise proper care of the animal prior to slaughter. Pen the animal in a clean, dry place the day before slaughtering. Restrict the animal from feed 24 hours prior to slaughter, but provide access to water at all times. The slaughter of hot, excited animals increases the risk of sickness, injury, and dark meat.
Animal Type
The kind of animal one selects for slaughter will depend on its ultimate use. For meat similar to U.S. Choice in palatability it is necessary to select a 1,000 to 1,200-pound steer or a 900 to 1,000-pound heifer that has been on full feed for at least 150 days. The time on feed influences palatability because of the fat content in the lean. Unfortunately, as most animals deposit fat in the muscle, they also deposit fat around the muscle. Much of the outside fat is usually trimmed off during cutting. If meat with less waste fat is desired, a steer or heifer fed on forage to 800 to 900 pounds will be suitable. If the animal’s age is less than 17 to 18 months, the properly prepared cooked meat should be relatively tender. Yearlings just off the cow with perhaps a short period on grass, weighing 400 to 600 pounds, will produce meat low in fat. This meat will be less flavorful than meat from grain-fed animals but should be acceptably tender. Many persons who slaughter on the farm expect the meat from an 800-pound forage-fed steer to taste like U.S. Choice or Prime.
Meat Yield
Well-fed steers from most beef breeds yield a dressed carcass weighing approximately 60 percent of the animal’s live weight. For example, a 1,000-pound live steer yields a 600-pound carcass. Yields will vary according to the feeding ration and the length of time on feed. Cutting losses from the carcass, such as bone or fat trim, vary from 20 to 30 percent or more. With a 25-percent cutting loss, which is not unusual, a 600-pound carcass would yield approximately 450 pounds of usable meat cuts. A good rule of thumb for carcass beef is 25 percent waste, 25 percent ground beef and stew meat, 25 percent steaks, and 25 percent roasts. Thus a 1,000-pound steer will, on the average, yield about 450 pounds of usable meat cuts. This figure can easily be as high as 550 pounds for an animal with very little waste fat to as low as 300 pounds for an animal with excessive waste fat.
PREPARING FOR SLAUGHTER
Prior to the day of slaughter, select the slaughter site, accumulate all equipment, prepare for waste disposal, and, if necessary, make arrangements with a local processor or meat market for chilling and cutting the carcass. If you plan to have the carcass chilled and cut up, arrangements should be made concerning the time and day on which the carcass can be accepted, the charges, and specific instructions for chilling, cutting, and wrapping the carcass.
Site Selection
Selection of the slaughter site is extremely important. A site with clean, running water is best. If a tree is to be used, a healthy limb 6 to 8 inches in diameter and 12 to 15 feet from the ground is needed. This will ensure that the limb will not break from the weight of the carcass and the carcass can be fully extended from the ground for viscera removal and splitting. If slaughter is to be done in a barn, be sure that a strong beam 12 to 15 feet from the floor is available. The floor should be clean and, preferably, concrete.
After selection of the slaughter site, clean up the area to ensure that leaves and dirt are not blown on the carcass during slaughter. If the site has a wooden or concrete floor, wash the floor and all equipment with plenty of soap and water. Be sure to rinse thoroughly because sanitizers discolor the meat and may cause off-flavors. If slaughtering is to be done outdoors use straw to cover the area where the carcass will be skinned and eviscerated.
The weather on the day of slaughter should also be considered. During hot weather, slaughter is best performed during the early morning or late evening hours. Since an inexperienced person will take 2 to 3 hours to complete the slaughter operation, care should be taken to preclude long exposure to high temperatures. During cold weather of less than 35°F, slaughter can be done at any time, since spoilage bacteria do not grow as rapidly in a cold environment. Slaughter during high winds will result in dirt and other contaminants being blown onto the carcass.
Waste Disposal
All waste products should be disposed of in a sanitary manner. If the work is to be done in the open, one should select a site with good drainage so that blood and water can drain away from the carcass. Blood and water must not be allowed to pollute nearby streams or other water supplies.
Disposal of viscera is often a problem. Arrangements should be made to have a local processor or rendering plant pick it up. If this is not possible, it should be buried so that dogs and other animals cannot dig it up.
The hide is a very important byproduct of cattle and represents about 7 percent of the live weight. After removal, spread it out in a cool place with the hair side down and give it a good application of ice cream or sack salt. About 1 pound of salt is required per pound of hide. The hide may be tanned or sold.
Slaughter Equipment
Elaborate and expensive equipment is not necessary, but certain items are essential (fig. 1). The following slaughter equipment is recommended:
- .22-caliber rifle with long cartridges or long rifle cartridges.
- Sharp skinning knife and steel (see the section on sharpening knives).
- Block and tackle or chain hoist—should have at least a ¾ or 1-inch nylon rope or chain.
- Chocks—concrete blocks work well.
- Meat saw.
- Oil or water stone.
- Ample cold water for washing hands, equipment, carcass, and byproducts.
- Tree with strong limb, beam, or tripod 12 to 15 feet high, or tractor with hydraulic lift.
- Beef spreader or single-tree (for 400 to 600-pound animal, 36 inches long; for heavy cattle, 40 inches long).
- Buckets (two or three).
- Ice or cold water.
- Straw for placing under animal during skinning and evisceration.
- Clean cloths or plastic for protection of meat during transport.
- Clean string.
Be sure that all equipment that will come in contact with meat is thoroughly cleaned. Most people get blood and other material on their outer garments during slaughter, which should not be transferred to the carcass after it is washed.
Additional equipment needed for cutting the carcass is discussed in the section on carcass cutting.
The Correct Procedure for Sharpening Knives
The basic operations involved in sharpening a knife are grinding, honing, and steeling. Maintenance of a sharp working edge often requires only steeling. If the knife is in heavy use, periodic honing is usually required daily or at least weekly.
1. Grinding (fig. 2) is necessary because new knives are not usually sold in a form sharp enough for immediate use. The stone should be water, or oil-cooled to avoid overheating the knife. The blade should not be ground back more than ¼ inch from the edge to form the proper bevel. The bevel should be the same on both sides of a skinning knife so that it may be used with either hand in removing the hide from a beef carcass. It is best to grind the knife by holding the knife edge against the stone at a right angle to prevent scarring the blade any farther back than the actual bevel.
2. Honing (fig. 2) is accomplished on a carborundum stone. Stones should be set in a block of wood or placed on a damp cloth to prevent lateral sliding. Hold the handle of the knife in the right hand with the blade edge pointed away from your body. Assume a position parallel to the side of the stone and place the heel of the knife blade on the end of the stone to your extreme left. Tilt the blade of the knife enough to make the bevel lie flat with the stone. Place the finger tips of the left hand on the flat of the blade toward the tip and near the back edge to exert pressure on the blade. It is very important for safety that the fingers of the left hand push downward only to maintain an even pressure on the knife blade over the stone. If the left hand pushes laterally with the sharpening stroke, and the knife catches on an irregularity, then the fingers will slip off the edge and can be cut severely by the freed knife blade. With a sweeping motion toward the right of the stone, draw the knife completely across the stone, against the cutting edge of the blade. The correct motion is achieved when that portion of the blade nearest the handle begins the stroke and the extreme tip of the blade ends the stroke. The procedure is reversed to hone the opposite side of the blade.
3. Steeling (fig. 2) is accomplished by using various kinds of steels that are adapted to specific uses. The carborundum and ribbed steels are for kitchen use where knives need not be razor-sharp and the steel is actually honing the knife. The mirror-smooth steel for razor-sharp edges is the one best suited for slaughter and meat cutting. The steel should be held firmly in the left hand in a position almost diagonal to the body but with a slightly upward tilt. This permits the free movement of the knife across the steel without drawing it too close to the supporting hand. Place the heel of the blade against the near side of the tip at a 20° to 25° angle and bring the blade down along the steel toward the left hand with a quick, swinging motion of the right wrist and forearm. The entire blade should pass lightly over the steel. Return the knife to a position on the opposite side of the steel and repeat the same motion.
To test the knife for sharpness and smoothness of edge, run the edge of the blade lightly over the flat of the thumbnail. If the knife slides easily, it lacks the proper sharpness. A sharp edge will dig into the nail and a rough or wire edge will rasp the nail.
SLAUGHTER
Stunning
The animal must be killed as quickly and humanely as possible. In a slaughter house the cattle are driven into a knocking pen where they are stunned with a compression gun. On the farm a mechanical stunner is usually not available; therefore, stunning is best accomplished with a well-directed long or long rifle bullet from a .22-caliber rifle. As with the use of any firearms, normal precautions should be taken when stunning the animal.
The purpose of stunning is to render the animal unconscious so that its throat can be cut. When stunning is accomplished with a .22-caliber rifle, the bullet should penetrate the skull and strike the brain. The location of the brain is shown in figure 3. If done properly the animal will be immobilized for several minutes.
It is best to have the animal secured to a tree or strong post. Direct the bullet at the intersection of two imaginary lines extending from the right edge of the poll to the center of the left eye and from the left edge of the poll to the center of the right eye as shown in figure 4.
Bleeding
Bleeding is a very important part of the slaughtering operation and should be done not more than 2 minutes after the animal is down because the increased blood pressure may break the capillaries and cause an unattractive condition in the meat called “blood splash.”
The easiest and safest method for quick bleeding is to bleed the animal while it is still on the ground. Standing behind the animal, grasp the lower jaw (fig. 5), pull the head back slightly, and cut across the throat from ear to ear as deeply as possible (fig. 6). If the blood does not flow freely, cut deeper. A sharp skinning or boning knife is appropriate for this part of the operation.
“Pumping” the animal will assure more complete bleeding. This can be accomplished by lifting the hindquarter with the tail, pulling the foreleg, and applying a pumping motion with a foot in the flank (fig. 7).
Removal of Legs
If the animal has to be moved to another location for hoisting, tie a rope or chain around the hindlegs above the hocks (fig. 8). Position the animal with the hindlegs directly beneath the hoist. Roll the animal onto its back and prop it in place with two concrete or wooden blocks (fig. 9).
Begin removal of the hindlegs by cutting through the hide and tendons between the sole of the foot and the dew claws (fig. 10). Split the hide from the dew claws down the leg to the hock and over the rear of the round to a point about 6 inches below the hock and remove the hide from each hindleg (fig. 11). Remove the hindleg by cutting through the joint closest to the foot with a knife or saw (figs. 12 and 13). Be careful not to cut the large tendons just below the hock for they will be needed when hoisting the carcass.
To remove the foreleg, cut through the hide and tendons at the joint closest to the foot. This joint is approximately 1 inch above the bony rise in the knee. Split the hide from the dew claws to the original cut and skin out the forelegs. Remove the forelegs with a knife or saw at the original cut (fig. 14).
Siding
After all legs have been removed, split the hide down the midline from the throat to the anus (fig. 15). This split should be made by inserting the point of the knife under the hide with the blade turned up as shown in figure 15. This procedure is referred to as cutting from inside out and protects against meat contamination from materials on the hide.
If a cow is being slaughtered, do not split through the center of the udder. Cut the hide around each side of the udder and remove by lifting it and cutting along the body wall. Removal of a large udder will make siding easier and prevent any fluids contained in the udder from spilling onto the meat.
Begin siding by splitting the hide on the inside of the round (fig. 16). Starting with the cut made in removing the hindleg, cut downward to the midline split, just behind the scrotum or udder. Cut “inside out” and do not cut through the fat into the meat. Skin the inside round around to the front of the leg, leaving all fat and connective tissue on the carcass and not on the hide (fig. 17). Inexperienced butchers have a tendency to cut too deep in this area, so cut slowly and carefully.
Removal of the hide from the belly or abdomen is the next step. Beginning at the midline split, cut under the hide until it can be grasped with the other hand (fig. 18). Loosen the hide along the flat surface of the belly from the round forward to the brisket (fig. 19). The insides of the forelegs can be skinned but not the outside, which protects the carcass from contamination when it is hoisted (fig. 20).
Siding (removal of the hide from the sides) is the next step and is very difficult to do perfectly. This requires a knife with a sharp, smooth edge; therefore, frequent steeling of the knife may be necessary. Grasp the loosened hide and pull it up and outward (fig. 21). This places tension on the hide, removes wrinkles, and allows the knife to glide smoothly. Holding the knife firmly, place it against the hide with the blade turned slightly outward to avoid cutting the thin flat muscles which cover the sides of the carcass. With smooth, sweeping strokes of the knife, skin from the front of the hindleg to the point where the hide was cut over the elbow. At this point, the muscles become thin and so tightly bound to the hide that it will be necessary to leave them on the hide. Cut through the muscles and continue skinning as far down the side as possible (fig. 22).
Return to the rear of the carcass and remove the hide left on the inside of the rounds (fig. 23). Do not skin the outside of the round because this can be done more easily after the carcass is hoisted.
Skinning the Head
The head should be skinned by splitting the hide down the midline (fig. 24) and by skinning down each side of the head and neck as far as possible (fig. 25).
Remove the tongue by cutting just inside each jaw to the forward point where the jaws join (fig. 26), making sure the tongue is straight so that it will not be cut. Pull the tongue out and complete its removal by cutting through the cartilage at its base (fig. 27). Wash the tongue thoroughly in clean water and put it in ice or ice water.
Remove the cheek meat from each side of the jawbone by cutting close to the bone and down to the rise of the bone just over each eye (fig. 28). Wash thoroughly in clean water and put it in ice or ice water.
Opening the Brisket
Beginning at the cut made for bleeding, split the muscles along the midline of the neck up to the end of the brisket. Cut only as deep as the windpipe. Cut lengthwise along the center of the brisket from the neck to its rear edge (figs. 29 and 30). Be careful not to cut beyond the tip of the brisket because the viscera may be punctured. Split the neck open along the midline and loosen the windpipe and esophagus. Saw completely through the brisket as shown in figure 31. Tie the windpipe and esophagus with string to avoid spilling paunch materials when the carcass is hoisted (fig. 32).
Hoisting and Rumping
Insert the spreader or single-tree between the large tendons on the hindlegs (fig. 33). For safety, the hocks should be tied securely to the spreader. After the spreader is firmly in place, hoist the carcass to a convenient working height, usually waist high, for skinning the rounds. Skin along the outside of the rounds leaving the fell, the thin membrane that lies between the meat and skin, on the round (fig. 34). This membrane protects the meat from rapid drying. After skinning around the anus, loosen it by cutting around it deep into the pelvic canal (fig. 35). Pull the large intestine about 6 inches from the pelvic cavity (fig. 36) and tie it with a string near the opening as shown in figure 37. To facilitate later hide removal from the tail, remove a thin strip of hide from its top side (fig. 38).
Skin the outside of the round, leaving the fell membrane on the round (fig. 39). You can usually pull off the hide in this region by hand, leaving the fell intact. At the bottom of the round, the fell is severed as shown by the arrows in figure 40. If a steer or bull is being slaughtered, remove the penis by cutting under it and severing its connection at the anus. Remove the hide from around the anus.
Evisceration
Split the pelvic bone by first locating the seam between the rounds, then following this seam to the bone and cutting through the bone with a knife or saw (figs. 41 and 42).
Hoist the carcass until the front shanks clear the ground by about a foot. Cut down the midline by inserting the knife handle inside the body cavity with the knife blade extended outward as shown in figure 43. This procedure ensures that the paunch and intestines are not cut. Continue cutting down the midline to the cut made when opening the brisket (figs. 44 and 45). Loosen the large intestines as shown in figure 46, making sure that the pelvic and kidney fat, as well as the kidneys, are left attached to the carcass. Pull down on the paunch and intestines and allow them to fall into a container or onto the ground. As the paunch falls, a small cut with a knife will free the liver from the connections to the intestines and paunch (fig. 47). Do not cut the esophagus, which extends through the diaphragm. The esophagus will be left attached until the lungs are removed.